Rebuilding a Raid 1 array: Using mdadm to add the new drive back to the array

Because of frequent disk failures that occur in my Mobile Desktop for reasons I’ve yet to conclusively identify, I decided early on to run two drives in a Raid 1 array. In this way, a single drive failure was easily overcome. A week or so ago one of my current drives started producing read errors and it was removed from the array by mdadm (linux’s multi-disk administrator). Today I’m adding the failed drive back to the array (currently only 1 active drive) and decided to post the commands I use so I can find them easily in the future. For more information on creating, administering, and repairing Raid arrays in linux, I suggest an article on howtoforge.com by Falco Timme.

As of right now, my Raid 1 array (md0) has one connected drive (really partition), /dev/sda1. The drive (partition) that I want to add back to the array is /dev/sdb1. Both drives are from Western Digital but sda is a 250 GB disk while sdb is a 320 GB disk. Because sdb was previously in the array, there’s nothing special that I’ll need to do to use it, but I will be limited to using only 250 GB of the space on that drive. Here is the output from some mdadm commands to clarify the picture:

ecellingsworth@MD1-LMDE ~ $ cat /proc/mdstat
 Personalities : [raid1]
 md0 : active raid1 sda1[3]
 244194841 blocks super 1.2 [2/1] [_U]
 ecellingsworth@MD1-LMDE ~ $ sudo mdadm --detail /dev/md0
 [sudo] password for ecellingsworth:
 /dev/md0:
 Version : 1.2
 Creation Time : Thu Sep 15 10:36:29 2011
 Raid Level : raid1
 Array Size : 244194841 (232.88 GiB 250.06 GB)
 Used Dev Size : 244194841 (232.88 GiB 250.06 GB)
 Raid Devices : 2
 Total Devices : 1
 Persistence : Superblock is persistent
Update Time : Fri May 31 11:41:27 2013
 State : active, degraded
 Active Devices : 1
 Working Devices : 1
 Failed Devices : 0
 Spare Devices : 0
Name : MD1-Ubuntu:0
 UUID : 7d0d271d:04fdd2c1:de65ca3f:4c375489
 Events : 1279820
Number   Major   Minor   RaidDevice State
 0       0        0        0      removed
 3       8        1        1      active sync   /dev/sda1

First I copy the partition table from the good drive to the failed drive. If you use any of these commands yourself, be sure you use the right drive identifier. If you switch sda and sdb, you will destroy the good drive.

ecellingsworth@MD1-LMDE ~ $ sudo sfdisk -d /dev/sda | sudo sfdisk --force /dev/sdb
 Checking that no-one is using this disk right now ...
 OK
Disk /dev/sdb: 38913 cylinders, 255 heads, 63 sectors/track
 Old situation:
 Units = cylinders of 8225280 bytes, blocks of 1024 bytes, counting from 0
Device Boot Start     End   #cyls    #blocks   Id  System
 /dev/sdb1   *      0+  30400   30401- 244196001   fd  Linux raid autodetect
 /dev/sdb2          0       -       0          0    0  Empty
 /dev/sdb3          0       -       0          0    0  Empty
 /dev/sdb4          0       -       0          0    0  Empty
 New situation:
 Units = sectors of 512 bytes, counting from 0
Device Boot    Start       End   #sectors  Id  System
 /dev/sdb1   *        63 488392064  488392002  fd  Linux raid autodetect
 /dev/sdb2             0         -          0   0  Empty
 /dev/sdb3             0         -          0   0  Empty
 /dev/sdb4             0         -          0   0  Empty
 Successfully wrote the new partition table
Re-reading the partition table ...
If you created or changed a DOS partition, /dev/foo7, say, then use dd(1)
 to zero the first 512 bytes:  dd if=/dev/zero of=/dev/foo7 bs=512 count=1
 (See fdisk(8).)

Now I remove any traces of the previous Raid information from the failed drive (partition).

ecellingsworth@MD1-LMDE ~ $ sudo mdadm --zero-superblock /dev/sdb1

All that’s left to do is put /dev/sdb1 back into the array.

ecellingsworth@MD1-LMDE ~ $ sudo mdadm -a /dev/md0 /dev/sdb1
 mdadm: added /dev/sdb1

Mdadm will then resync the two drives by copying everything from /dev/sda1 to /dev/sdb1. This process takes three to four hours for my 250 GB drives and will be longer for larger drives. You can monitor the rebuilding process using the following ‘cat /proc/mdstat’. I like to run this command with ‘watch’ every few seconds to see the rebuilding progress in real time.

ecellingsworth@MD1-LMDE ~ $ watch -n 5 'cat /proc/mdstat'
Every 5.0s: cat /proc/mdstat                            Fri May 31 11:51:17 2013
Personalities : [raid1]
 md0 : active raid1 sdb1[2] sda1[3]
 244194841 blocks super 1.2 [2/1] [_U]
 [>....................]  recovery =  2.6% (6465024/244194841) finish=124.7
 min speed=31746K/sec
unused devices: <none>

Don’t trust the estimated time. The rebuilding process will run in the background, but if you are using the PC at the time, the rebuilding has to pause every time you need access to the file system. And, for some reason, rebuilding tends to slow way down near the end.

Edit 12/17/14:

I’ve used the above process to add back to the array a failing drive several times now. However, in my case, since I’m adding back the same drive that was previously in the array, it’s not necessary to copy the the partition table from the good drive nor is it necessary to zero the superblock on the failed drive. Instead, I use one command “mdadm -a” to add the drive back to the array and it rebuilds fine. This has the advantage that it’s much less risky. There’s no chance of destroying the good drive by wiping it’s partition table or superblock. And, I doubt anything would happen if you told mdadm to add a drive that’s already in the array, though I’m not going to test this theory myself.

Update the DNS record for a Namecheap hosted domain automatically

I thought I’d share this technique I use to update the dns records for hellonull.com automatically from the web server every 5 minutes. In the event that my ISP issues me a new IP address, my site will hopefully only be down for 5 minutes.

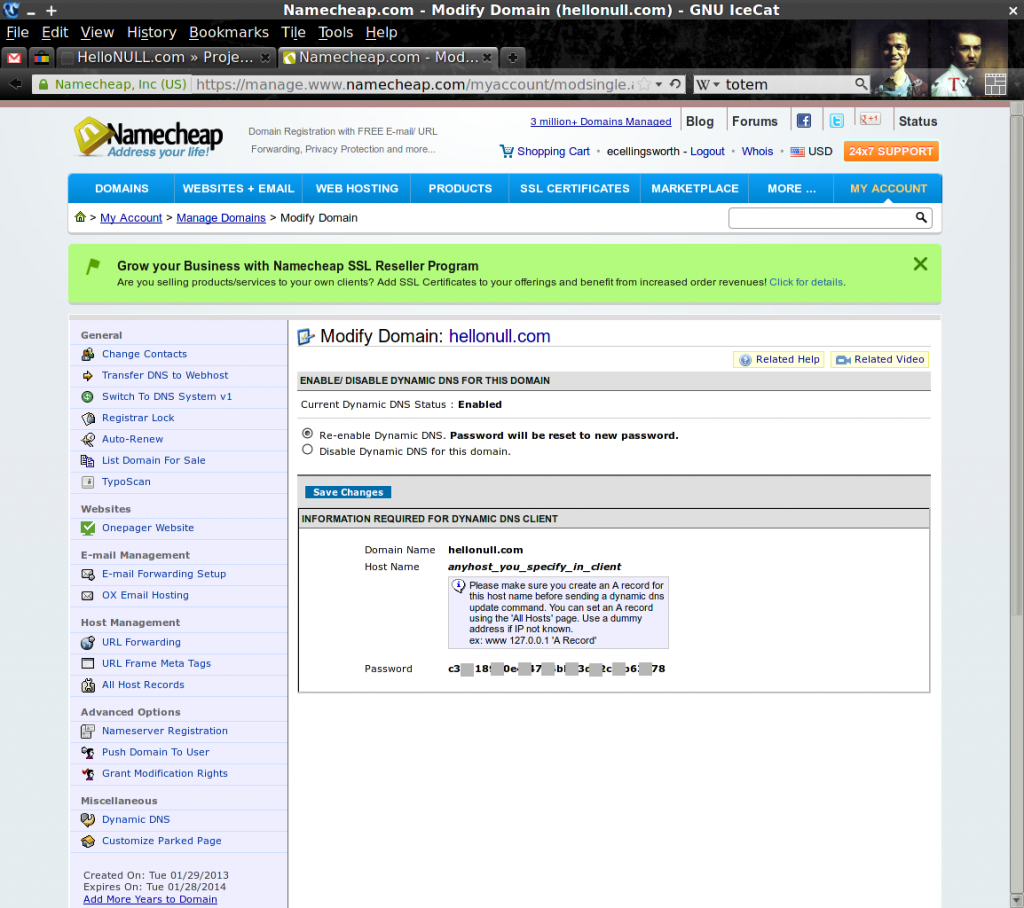
First, you must obtain the dynamic dns (ddns) update password for your domain from Namecheap. At the time of this post, this was done by clicking the ‘Dynamic DNS’ link from the left hand menu, once your domain was already selected. When you enable dynamic DNS, a password will be generated that looks like a long string of random letters and numbers. Copy this down.

Screenshot - 05182013 - 02:59:52 PM

Next, put this password into the updateddns.sh script (below) and edit the wget commands to point to your hosts (@, www, etc.) and domain (hellonull.com). Make this script executable. It’s a good idea to make the owner of this script root and save it in a protected location, like /root because it contains ‘plain-text’ passwords. Anyone who is able to access the script is able to read the password and is therefore able to change your site’s DNS records.

#!/bin/sh
# This script updates the dynamic DNS record for several domains
# hosted on this server. It is run automatically by cron. The crontab
# file that makes this happen is stored in /etc/cron.d/ddns.
# While this script can execute as any user, it should be owned by
# root because it contains 'plain text' passwords.
# Each host (as in host.hellonull.com) must get updated individually.
# In addition, all subdomain records must be updated individually.

logFile="/var/log/updateNamecheapDDNS.log"

# this is the password as generated by namecheap
pass="You'll have to look at the original or get new ones"

# add a wget line for each host and subdomain
wget -a $logFile -O /dev/null "https://dynamicdns.park-your-domain.com/update?host=www&domain=hellonull.com&password=$pass"
wget -a $logFile -O /dev/null "https://dynamicdns.park-your-domain.com/update?host=@&domain=hellonull.com&password=$pass"
wget -a $logFile -O /dev/null "https://dynamicdns.park-your-domain.com/update?host=teachingwiki&domain=hellonull.com&password=$pass"

If you run the updateddns.sh script it should update your DNS records. To automate the process simply schedule the script using cron. I added a crontab file called ddns in /etc/cron.d which executes the script every 5 minutes.

# use this file to schedule ddns updates
SHELL=/bin/sh
PATH=/usr/local/sbin:/usr/local/bin:/sbin:/bin:/usr/sbin:/usr/bin

# every 5 minutes
*/5 * * * * root /root/updateddns.sh >/dev/null 2>&1

GtkGrid alignment issues

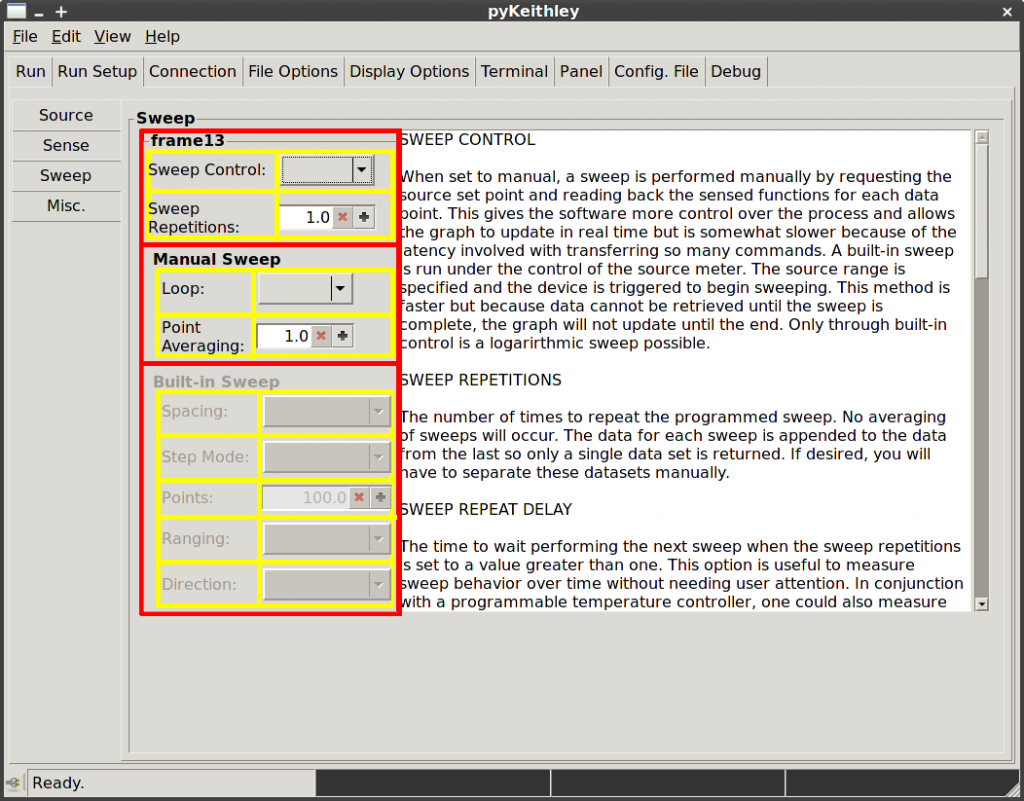
Recently I ran into a problem laying out some controls with a GtkGrid widget that took quite a while to figure out. My controls were contained within a vertical GtkBox with three rows. The first row contained a grid with two columns. The left column housed labels and the right housed the actual controls. The next two rows of the vertical box were similar except the grids within were contained within a frame. The main vertical box itself is in the left column of a 2 column horizontal box. The right column contained a GtkScrolledWindow with a GtkTextView. The scrolled window was set to expand to take up all of the remaining horizontal space in the window. Problem was, the controls on the left weren’t aligned properly. A picture should help the explanation.

Screenshot - 05172013 - 11:48:09 AM

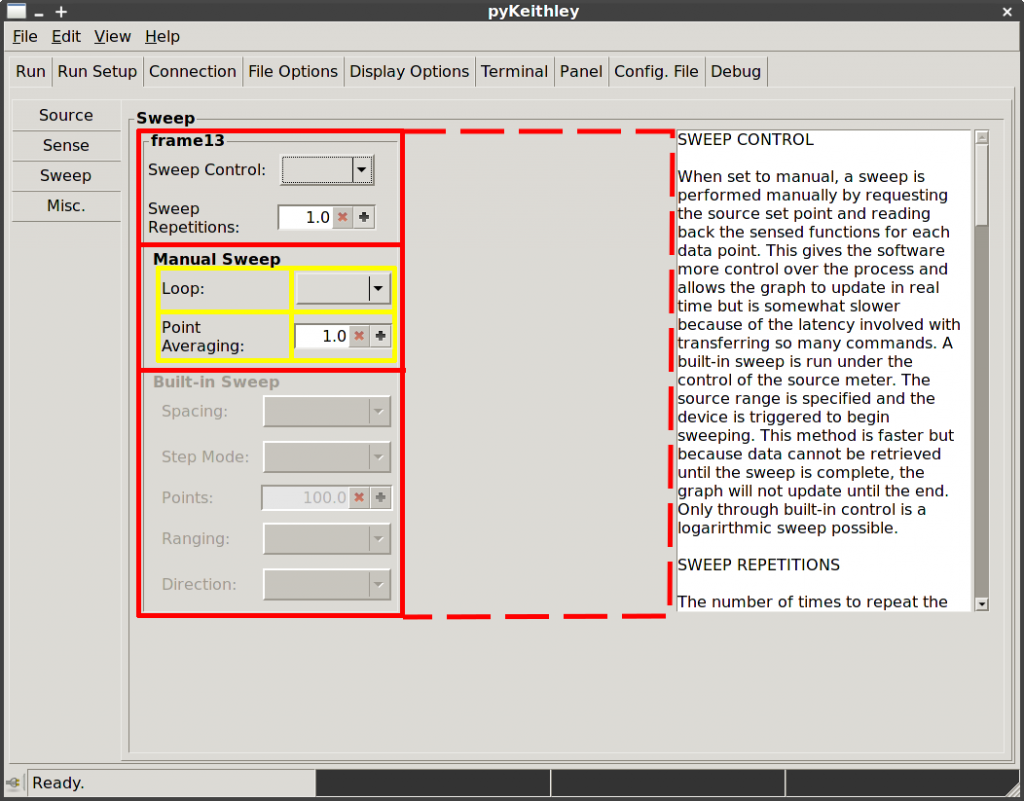
In the image, the vertical box (red) has been enclosed within a GtkFrame (frame13) to show its borders. As you can see, the controls in the yellow grids are aligned to the left and do not fill the cells of the grid. I would like them to be either right aligned or to fill the cells of their parent grids so that the right edge of all controls are aligned. This turned out to be nearly impossible. Most solutions I tried would cause the scrolled window in the adjacent column to shrink for apparently no reason to about 1/3 of the total horizontal area. The image below is an example of one trial solution in which I set the horizontal expand property of the GtkLabel “Loop” to True. The label expands to push the neighboring control (a GtkComboText) to the right side of the vertical box extents. But for some reason, the space outside of the vertical box is allocated to the label’s parent grid instead of the scrolled window.

Screenshot - 05172013 - 11:43:50 AM

The behavior is the result of the GtkGrid inheriting the hexpand property its child, the “Loop” label, and so on up the chain. The vertical box doesn’t appear expanded, but it is allocated the space anyway. To override this reverse inheritance behavior, one must set the hexpand property of the parent container (the vertical box in this case) to False. I’m designing in Glade and by default, this property is “No” for all widgets. This is not the same as setting the property to False. The workaround is to add a line of code to force the property to be false. I have unfortunately not found a fix that can be applied within Glade. The line looks something like this:

    builder = Gtk.Builder()
    builder.get_object('verticalBox').set_hexpand(False)

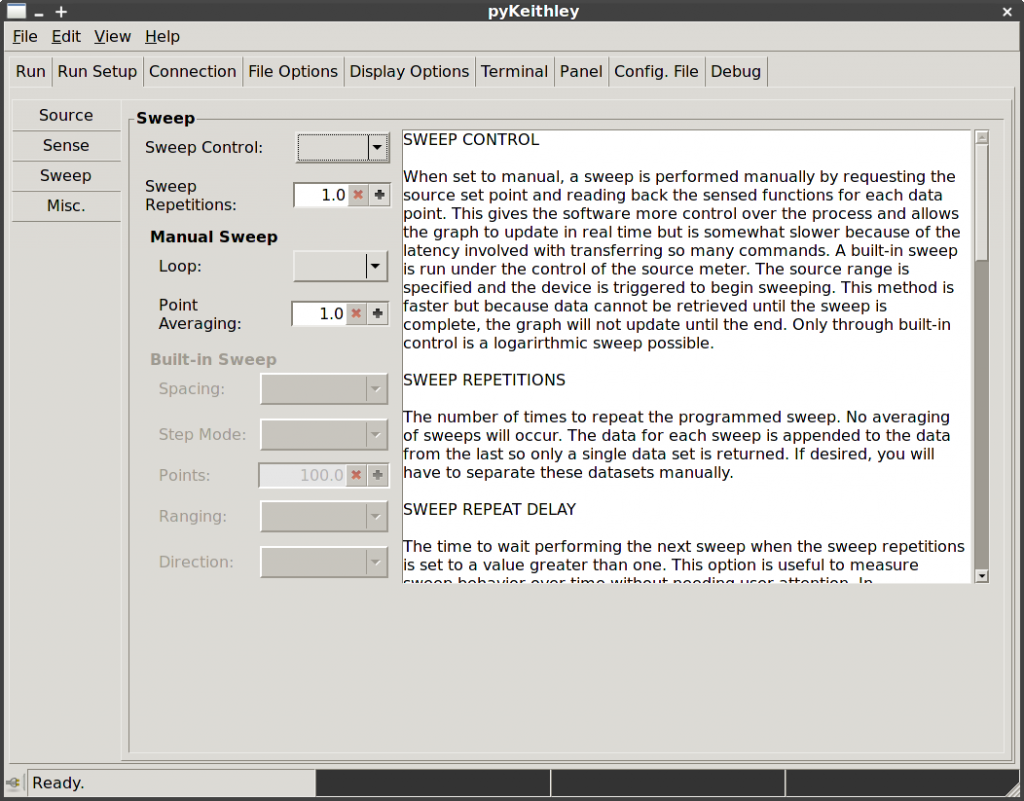
From there, setting the horizontal expand on the labels pushes the controls to the right, but no space is allocated outside of the vertical box parent. The successful alignment, with frame13 removed and some column spacing added between the controls and the scrolled window looks like this:

Screenshot - 05172013 - 12:11:45 PM

This project is being developed in Python 2.7+ using the Gtk+3 framework. The UI is designed in Glade 3.

Saving the image drawn with Cairo on a GtkLayout or GtkDrawingArea using a pixbuf

In my previous post, I discussed how to get the draw() event to fire for Gtk3 widgets in order to draw on them using cairo, specifically the GtkLayout and GtkDrawingArea widgets. Since that time I’ve had some success writing code to plot data from a connected source meter (through the RS232 port) in real time. I got stuck again trying to save the image drawn on the GtkLayout to a file. Most of the material I found on the internet wasn’t up to date and not relevant for the GTK3 framework. Finally I figured out how to save the image and it’s pretty easy to do too.

The solution is to get a GdkPixbuf from the widget’s GdkWindow and use the GdkPixbuf’s .savev() method to write the image to disk. For some reason, when I use the .get_window() method of GtkWidget’s, I don’t get a GdkWindow returned but rather a GdkX11Window object (gtk.gdk.X11Window). I’m not sure why there’s a difference but it seems to be ok to feed this into the Gdk.pixbuf_get_from_window() function. Please note that you must use the .savev() method of the pixbuf. Most sources online use the .save() method but that seems to be gone in Gtk3 (or perhaps there is no python binding?).

For example, assume you have a GtkLayout stored in the variable layout (I find mine with layout = self.builder.get_object(‘mylayout’) – because I’m using Glade). To capture an image of the layout and whatever you’ve drawn on it, you would do the following:

pixbuf = Gdk.pixbuf_get_from_window(layout.get_window(), 0, 0, width, height)
pixbuf.savev("foobar.png","png", [], [])

In this example, width and height need to be the width and height of the widget. The rectangular area defined by (0,0) to (width, height) is saved. In my case, I did something like this:

rect = layout.get_allocation()
width = rect.width
height = rect.height

In the .savev() method, the first argument is the file name, the second is the type, and the third and forth options are arrays of options and their settings. I pass empty arrays because I don’t set any options.

Note that this works with GtkLayout and should work with GtkDrawingArea and GtkWindow. For other widgets, the window returned by .get_window() seems to be that of the parent GtkWindow. If you want to capture an image of those wigdets, you’ll need to specify the x,y position of their top left corners in the Gdk.pixbuf_get_from_window() call.

layout

Drawing to GtkLayout and GtkDrawingArea with Python

This one took me several hours to figure out. I’m writing an application that will include a graph of some data collected from the serial port (using the pySerial library). I’m writing the application in Python (2.7.2+) using the GTK 3 framework. UI design is being done in Glade 3. To make the graph, I wanted the base object to be a GtkLayout widget because this widget can be scrolled (inside a GtkScrolledWindow), can contain other widgets, has a fixed layout, and can be directly drawn to.

The problem was, I couldn’t get the draw event for the GtkLayout to trigger no matter what I did. The problem was worsened by the fact that most of the information online is not relevant for Gtk 3, or if it is, it uses the GtkDrawingArea widget instead. But, even when I gave up and went with a GtkDrawingArea widget, I still failed to trigger the draw event.

Finally, after reading everything ever written on the internet, I found the answer in a forum (link below). I was missing the python-gi-cairo package (Debian package) which has the python cairo bindings. After installing this package, the draw event triggers as expected and I’m able to draw to both the GtkLayout and GtkDrawingArea widgets. I didn’t even have to add another “import” line to my script, which is nice, but the dependency still exists.

Link: http://python.6.x6.nabble.com/pygi-gtk-drawingarea-doesn-t-work-td4981920.html

A GtkDrawingArea example: https://git.gnome.org/browse/pygobject/tree/demos/gtk-demo/demos/drawingarea.py